Wednesday, May 29, 2013

GUEST GALLERY: "Norway-1943" 1/32 by AITOR AZKUE.

This is the latest piece from Aitor Azkue. If you don´t recall the name you´ll may want to check his "Never Ending History?" here, you most likely remember it.
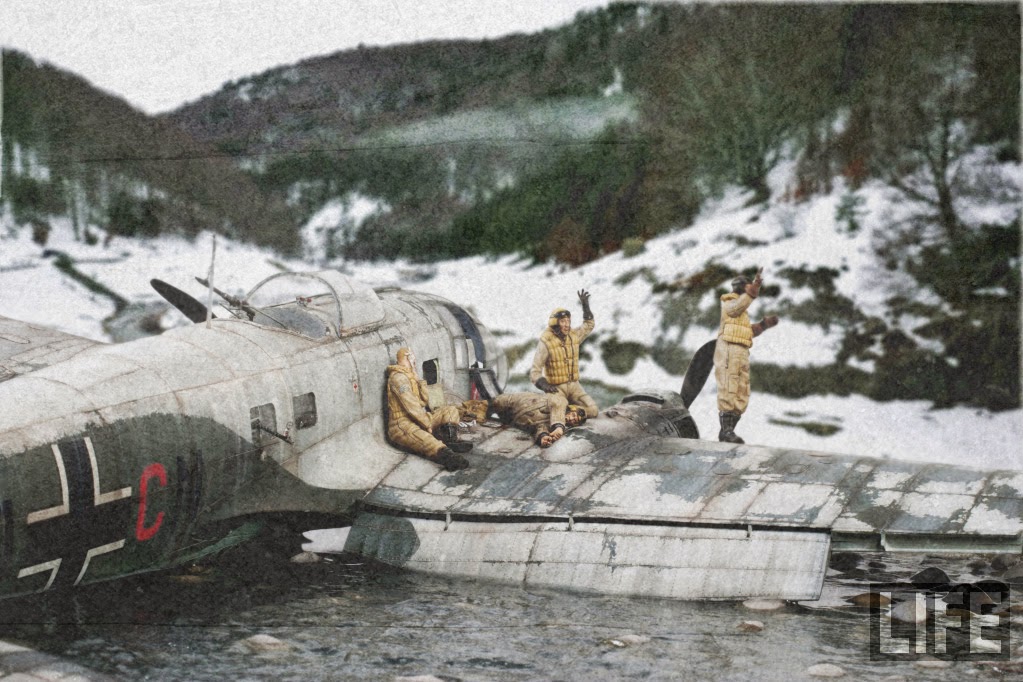
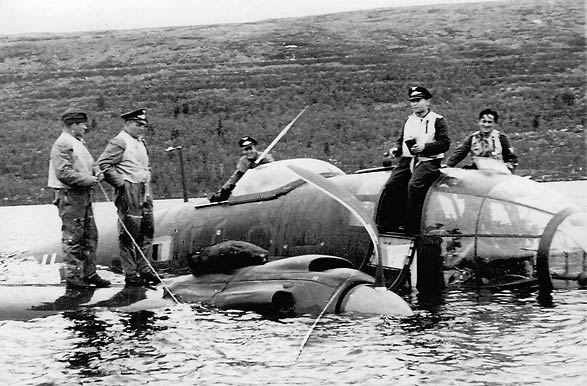
With this work Aitor bring us a dramatic sight of the most bitter side of aviation. As usual in his latest works the central scene attracts immediately the viewer attention making us to focus in the story. From there we can begin a voyage around the surrounding background just to check the amazing level of detail and realism that enhance the emotion of the message. Aitor is a diorama artist that transcends the mere standards of technical skills in modelling and composition and search a way to touch the spectator. An artist in all the extension of the word (a not enough valued modeller in my opinion, but certainly he will be).
Just a thought about one of my favourite elements, the derelict skiff or, as I like to say, the oblivion boat. Why is it there? Is only an element for filling an empty angle? It has some significance? Well, everyone can make his guess but personally I think it is a sour metaphor about the doom of the crashed bird and maybe of the wounded crewmen as well.
It is hard to be original in the qualification of these kind of works; Aitor always makes me to improve my English vocabulary. What about delightful?
I hope this Norway bitter scene moves you as much as it moved me.

Q  


The inception:


The culmination:


Friday, May 24, 2013

The Black&White Technique. Tiger I 1/48 by JOSE LUIS LOPEZ. (III)


More steps! .... I see the end!!!!!

Washes ... they always help to increase the perception of the details of the kit. 1/48 kits are not as accurate as 1/35 counterparts. And if there were the same quantity of aftermarkets available for the quarter scale, they´d be more difficult to place that in the bigger scale. 1/35 PE sets are a nightmare by them self so, in 1/48, for not very skilled modellers like me, are just a Chimera. So, in my case, I have to hide this with the paint, showing as much as possible the details available in the kit and bring them to life.

Before the washes, I applied a pair of solid coats of Tamiya´s clear, the perfect base for washes as it facilitates the washes to run easily around the kits details.

For this task, as in the previous steps, I used Tamiya Panel Line Accent colour mixed with KX 52 Flat Earth, using Tamiya´s thinner (blue cap) to keep the mix fluid and easy to handle:


Oils: Modeller´s best friend without a doubt! Easy to handle, slow dry, excellent blur just perfect! Using different oil colours, Naples Yellow, Van Dyke Brown, natural umber, blue, white, red . And using the well-know technique of dots I faded the grey colour trying to reduce the contrast of the different shades of the grey and hiding a little bit the chipping aggressive effect of previous steps:


A couple of detail shots of the weathering so far. After this step, I´m ready for the real heavy weathering with dust and dirt:


I used AK Interactive´s enamel Africa dust (AK22) instead Tamiya´s enamel because I felt that the yellowish dust of this product will suit perfectly to the Kitty. If you have not this product, you can also use Tamiya´s enamel paint to do it mixing buff, white and a little bit of desert yellow.

This technique is used by many modellers and the results are really awesome for me. But you must be strong and have faith on your hands, as the intermediate steps of this technique are, how to say this, difficult to assimilate if you have not clear the final look of the tank finished.

I directly airbrushed the product from the bottle without problems:


Now, using AK´s thinner, I started to remove the applied dust to my taste. I just waited 15 minutes and then, using a brush, I cleaned the kit in the desired areas. Even the next day I was able to do this because of the enamel´s nature of the AK´s product. I must say that I´m happy this product, easy to apply and easy to remove with a tasty colour for me. What else?:

Once the base dust colour shapes are OK for me, I applied a nice coat of matt varnish (Marabu) to seal the dust and to avoid any damage from further steps.

Once dry, a pair of days, be patience, I add some dirt details here and there using acrylic paints. I always use the same colours for this: black, dark mud and buff. Mixing them I got a nice dirt colour series. I added a lot of water to the mix to ensure that the desired effects are subtle and if I want a more intense effect, I have just to insist with the brush more times, that ´s all!

So, using these colours, I made different contrast in the dust for a more attractive look. Important thing in this step: The dust on a kit makes it looks, how to say, diffuse, smashed potatoes. Undefined. Excuse me for my lack of English! The dust makes all the details to disappear. So, we have to help the kit with some washes here and there. For me, a kit without depth in the details is a fool! I made the washes using the darkest mixes of the acrylic paint.

So, finally, I think that I managed to return to a highly contrasted Kitty even with dust:


The only remaining effect is the mud, but that will be in the following chapter. I PROMISE that the next part... will be the last!!!!! happy.gifhappy.gifhappy.gif


Tuesday, May 14, 2013

The Black&White Technique. Tiger I 1/48 by JOSE LUIS LOPEZ. (II)


The Panzer Grey base colour: 
I just used Tamiya´s XF-63 with a little bit of pure white and I applied this extremely thinned paint mix (90% thinner) in several coats. I insisted with the mix more or less depending the place but, as can be clearly seen in the pictures, all the underneath effects can be clearly seen and look integrated with the base colour. Just at the end, I airbrushed pure white in a few parts to get the maximum light.

Is very important to airbrush slowly the base coat, no hurry. Just see how it covers little by little the weathered base to your taste. You can hide the awful dirt spots or the illogical and ugly chips.

And most important: From this moment, you have a base colour that will be really helpful in the following steps as you have a map, a guide to highlight, chip and weather your kit. From now ahead, you have your second chance.


Now, time to the first base coat for the accessories. Probably once the vehicle is close to be finished, I´ll change some of the colours according to the general aspect of the vehicle. But I like to paint this base coat to the tools, accessories, because it really helps to evaluate the general contrast and finish of the tank. I used different brown colours for the wooden parts and pure black for the metallic parts. 

In this step, I´ll add some light points to the tank. Using a light mix of black, white and medium blue (acrylics) and using a brush, I start to highlight rivets, edges, hinges, etc. Maybe the result in this step is a little bit unrealistic, but it´s the perfect base for future weathering works. These parts will suffer different treatment that will darken them to my taste, but always maintaining a subtle colour and light difference with the neighbouring tank parts.

Is this colour modulation? Maybe, I do not know, but really works for me!


Chipping, as well as adding mud, are the most frightening steps for modellers. Many great kits with excellent base coats, filters, etc, are spoiled in this step. Reasons are various. The first one is that maybe, the last time we made them, was 4 months ago when we made our last tank. Our hand is cold and it´s not easy to get the pulse and the perfect mix of the paint once we´re beginning our work. In this case, just some days ago, we´ve already made plenty of them in our B&W base colour. So, our hand is ready! And now, under the base coat, we see some of the chips and scratches we have already done, so it´s not so terrifying for us, because our terrible enemy, a flat, clean surfaces, is already dirt, showing some chipping effect. What we have just to decide if we increase them or not!

And, as we have seen the B&W weathered step, we already know which chips are right and which are wrong. So, as I use to say, we do not work under pressure, we have a ready hand and a clear idea about where to put our chips and scratches.

For this step, I made three different grey colours for the superficial chippings.

And with a mix of black and red, the deeper ones.


Some detail shots:


The next step will be about washes, oils and more weathering.


Thursday, May 9, 2013

The Black&White Technique. Tiger I 1/48 by JOSE LUIS LOPEZ. (I)

Hi everyone, Jose Luis Lopez is one of those innovative modellers I love. In this article he explains with a complete step by step his Black&White painting technique. Whith this technique you can get a perfect and awesome lighting effect and also allows us to check the main painting effects and retouch them before applying the colour with a quite transparent coat. In short, it is like a really advanced pre-shading. JL also used this technique in the 1/35 T-55 Enigma that you can find in the Guest Gallery or clicking here.

Q


PREPARING THE BASE TO WORK.
When you´re painting a kit, all the steps are important. So, I can´t say that these three first steps are the most important. but, for many modellers, the bad results painting with the airbrush starts here.


Picture 1: In this step, you can see Gunze´s Metal primer. I always apply this primer with a brush over the metal surfaces. Gun barrel, PE parts. All metal parts are covered with a thick, really thick coat of this product. This will protect the metal parts from aggressive painting thinners and avoid the paint to peel off.

Picture 2: Once Gunze´s primer is dry, I apply with an airbrush Tamiya´s surface primer. This is the first time I use the white primer and I must say that it´s more difficult to apply than the grey one. Very important: an airbrush is not a brush. You do not have to cover a surface the first time you paint over it. No, no, no, do it in several fine coats, the price is to achieve a nice surface, not finish the first! I´ll insist a lot about this. The airbrush is you friend, he can really make you life easier! Just use it in the correct way. 

Picture 3: One of the most desperate moments for the modeller is when he discovers than the paint over the kit is granulated. People use to hate this, and therefore, the airbrush. There are several variables that help the enemy to granulate your kit surfaces, lack of moisture in the air, too much dust in the environment, bad paint, bad airbrush but even in the worst situation, you have a great ally: a fine sand paper. Use it when necessary over granulated surfaces (be careful with PE parts!), and, very important, the surface must be soft and clean as the skin of a baby! Of course, if you´re making a big tank with rough surfaces no matter, but a smooth surface prior painting is start playing with advantage! 

Now, we have to start preparing our Tiger´s skin. Here starts the challenge. Why this technique? In my case, because I have no a clear idea about colour theory! Most of times, when I want to lighten or darken a colour (dark yellow, for example), the results are anything but harmonics. So, I´ll make the zenithal or modulation effects with a black-grey-white series with no chance of mistake as I just will use black and white colour. Of course, actually you can find a lot of colour sets that makes you life easier (AK Interactive, Lifecolor) and I strongly recommend them. But as I use to customize a lot my base colours and I´m a little bit poor ( :^(), I´ve invented (¿¿??) this technique to achieve similar effects just with black and white paint (and the base colour). Hope you like it!!

Picture 4: General preshading. For me is an important step as I help to start visualizing the final result. I can discover light effects, have a preliminary idea about the weathering and the most attractive parts of the kit (for painting). With this B&W technique not too much of this step will be seen later (just a little bit, enough to keep the future general looking). I used a 90% black 10% mix applied with my airbrush, using Tamiya acrylic paint thinned with Lacquer Thinner. I´ll repeat this hundred times use your airbrush not like a brush. To pass over a surface do not implies the surface is painted. It´ll be painted may be the 6-710 time you pass over it. 


Picture 5: Using first a 80% white and 20% black, I started to paint the general colour of my B&W base, As usually, the paint is heavily thinned as I also want that the preshading work can be seen under this general base colour. Adding each time more white to the mix, I start to play with the modulation and zenithal lights over the vehicle. The last step is made using pure white paint. Yes, I know, some skills with airbrush are required, but this preliminary base is a great choice to start taking confidence with one of your best weapons!. Always remember, an airbrush is not a brush. Always thinned paint, move quickly but with precision (the same precision you use to make incredible PE detailing work!). Always try on a piece of paper before painting your model. A nice base coat, even without any kind of modulation or highlights, always takes 2 or 3 sessions. In the first session, the paint should be barely visible. Do it always little by little. Due to high temperatures here in Madrid and the dry environment, I´ve problems painting. Even with care, sometimes the paint arrives dry to the surfaces but remember, your friend the sandpaper is always there, supporting you! 

Picture 6: Using pure white acrylic paint from Vallejo, with a brush, I just painted some details here and there (clasp, rivets, edges). I played with the number of coats of paint (one is never enough, like with airbrush) so, not all the details have the same white intensity. I always look for very rich bases, with several colour shades. The result by now looks strange, even the pictures seems rare (the white background does not help!), but now we have the perfect base for chipping and weathering!

Picture 7: Now, time for chipping. For many modellers, a real nightmare. Actually, it´s a really difficult step, not only making them in the right shape, but also locating them in the correct an reasonable places. And it´s also a tedious work and frustrating at times And many, many, many times, a good painted kit is spoiled by a bad chipping work. And there´s no second chance with chippings, unfortunately.

And another important factor: How many kits we make in a year? As the average modeller makes 2-3 kits per year, our hands are not always trained to make chipping and scratches. So, when we´re making our chipping work, it was more than 4-5 months the last time we made them. So, we have no habit, no pulse and the first chips are awful? Just when we have been for a pair of hours making chips they start to look nice, just in the moment the work is finished!!. And most times, there are too much chips, or are wrongly situated, or are poorly done. Time to cry. But with this technique, you have two chances, In the first, now, let your hand get warm, do the chips without fear, with confidence, dare to risk with some of them, and, most of all, once you finish this step, stop. Stop. Stop. Look at your kit, investigate it, localize the nice chips, think about the finished tank. And think about keeping the right ones, the places where some are missing, or the places where none is necessary and you´ve already paint several chips. All these are not real problems, as when we paint the base colour we can hide or enhance them at our will.
But, most important once finished this step. Your hand is ready for painting the final chips and you now know where are they wrong and where are nice. You have a second chance later.
I used Vallejo paints for this step, using pure white for some chips and a light grey for the chips located at the darker parts of the Tiger.


Picture 8: General washes all over the tank. I used for this task Panel Line Accent Color from Tamiya, a great product that can be mixed with any of Tamiya´s enamel range and can be thinned with Tamiya´s thinner (blue cap). Previously, I added an generous and thick coat of Tamiya´s clear with my airbrush, a completely necessary base for washes and weathering with this technique.
Also an important step. Here, all the details will become to live, and, something else, a completely no removed wash over a plane surface is a kind of weathering after all!, By now, you´ll probably locate very attractive parts of your kit, which now is far from looking a toy. In 1/48 scale, this step is especially relevant due to the lack of detail of these kits comparing them with their 1/35 counterparts. 


Picture 9: Another view of the Tiger with washes.

Picture 10: Time for weathering. Not a real weathering but a kind of weathering that will help you to create a surface full of contrasts and nice looking for the future base colour. Like on chipping task, you have now the perfect choice to risk and dare with the effects in this step. Start thinking about the finished tank and start looking for attractive weathering and colour effects here and there. And do not do it under pressure, just enjoy playing with your brush. Improve your skills no matter if you fails!
For this task I used Vallejo Glossy Black, which suits perfectly to this task. The procedure is simply. Make a spot, a mark, a dirty surface with the paint slightly thinned with water. Do not worry, do it in a rude or exquisite way, but do it and experiment yourself with the shape of the spots and rain marks or any kind of effect you want. 


Picture 11: Once the glossy black paint is dry (5-10 minutes or even less), with a cotton stick, start removing the paint like if you´re using an pencil, drawing the final shape of the weathering all around the kit. And, once again, you´re working without pressure because if the spots made in the previous step were horrible and without sense, you can erase then partial or completely at your will. You can be extreme painting several dirt spots, and then, calmly, always thinking about the finished tank, erase or modify them to the best way. 

Picture 12: The finished step. And, again, think about the actual result and the way you want to finish the tank. You have time to change, modify and improve anything you want. And, once again (apologizes if I´m repeating too much), work without pressure during these steps, preparing your hands for the following more demanding steps do you feel your hand warm and ready? Great! 

Next step, painting the base color!